Sometimes, you get a lot of messages, and a little assistance from your email client can make all the difference in finding what you are looking for. Below, you will find instructions on creating a rule in your email client to organize all your SchoolData.net communications into one tidy place.
Setting Up Filters for Outlook Online Office 365
- Log into Outlook for Office 365.
- Click the gear icon
- Search for the term rules and then click on the Inbox Rules.
- Click the “+” symbol to add a new rule.
- On the next screen, name your rule.
- Under When the message arrives and matches all these conditions, select It includes these words from the dropdown menu, then choose, In the sender’s address.
- On the next screen, enter @schooldata.net in the text entry field.
- Click the “+” symbol.
- Click OK.
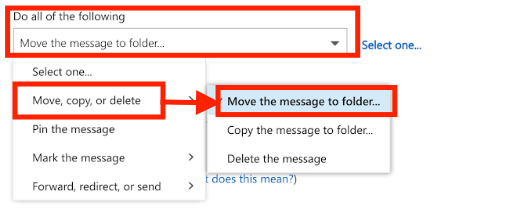
- Next, select Move, Copy, or Delete from the dropdown menu under Do all of the following, then choose Move the message to the folder.
- To create a folder to contain the messages moved by this rule, right-click your name at the top and select Create New Folder.
- Type the name of the folder, then press enter to confirm.
- Once the folder appears in the list, click the new name to select it, and then press OK.
- Once you have made any final configurations, click OK again.
- You have now created an email rule to automatically parse all your messages in Microsoft Outlook Online for Office 365.
Comments
0 comments
Please sign in to leave a comment.