Quick Links
| Navigating | Settings Tab - General | Passages Tab | Sharing |
| Formatting Assignments | Assignment Instructions | Questions Tab | Banks |
| Details Tab | Standards Tab | Points Tab |
In Classroom, the word "assignment" means any work given to a student culminates in a grade. There are four types of assignments:
- Coursework,
- Formative Assessments,
- Summative Assessments,
- Interview Assessments
Coursework is any standard homework or directive. It includes projects, reading chapters or books, fieldwork, essays, lab notes, etc. Coursework comprises the day-to-day tasks for students to receive a score or grade. While a grade is the ultimate objective, coursework is not required to be scored.
Formative assessments, or progress monitoring assessments, are quizzes and tests which help students review what they have learned and provide the teacher with information on whether the student is gaining competency in the subject matter. In Classroom, the answers to questions can include a distractor analysis. This information about the answer choice is another opportunity for the student to engage in learning. Distractors provide immediate feedback to the student on whether an answer is correct. If taken online, the formative assessment, using distractors, allows the student to modify any incorrect answer before submitting the assessment.
Summative assessments, or benchmark assessments, are final exams or term exams, usually required by the district, given only a few times a year. Like a state-required assessment, summative assessments usually remain a part of the student's permanent record. Any summative assessment administered through Classroom can be migrated to Homeroom. This is a district-level decision. But, after taking a summative assessment online, the results are available the next day in Homeroom, allowing comparison to other state and third-party assessments. Classroom, though, does allow a teacher to use summative assessments without porting them to Homeroom. Using summative assessments based on standards that must be mastered can provide educators with opportunities to show student growth.
Interview assessments, or one-on-one diagnostic assessments, are benchmark or progress monitoring assessments to help determine a specific level of instruction or identify root causes of issues of struggle. Simple words or phrases are displayed on tiles allowing the teacher to mark correct, incorrect, and no response for each item.
The culmination of all assignment types is a term grade. These can be given by standard, learning target, competency, or the traditional grade literal (A, B, C, 1, 2, 3).
Navigating (back to Quick Links)
To create a new assignment, go to Assignment Templates, the New Assignment Template link from the directory tree on the left, or by selecting the Assignment Templates link from the Compose section on the Home page.

You are presented with a blank New Assignment Template. There are tabs across the top, Details, Settings, Standards, Passages, Questions, and Points.

Selecting any of the tabs takes you to that section of the form. Drop-down lists contain the acceptable values for many of the form fields. Use the Continue button to step through the form in wizard fashion, and use the Cancel button to exit at any time. Select Save & Continue or Save & Exit to keep your work.

You can use the breadcrumbs across the top to access previous screens. You can also use your browser's Back and Forward buttons.

Also, many of the fields listed on the form are optional. While this information is unnecessary to create the assignment, it will help other educators locate it during filtering and searching.
Formatting Assignments (back to Quick Links)
Every section of an assignment that can contain text has a text editor. One thing to remember while composing...you are creating a document for the web. What you create will be read by various browsers on various operating systems. It is not the same as creating a document in a word processing program. There are features you may not be used to and ones you expect to be there which are not. Most of the common text formatting features are available, though.

When you select the insert link icon, the only field required is the address or location of the page you want to link to, this is called the URL. Select the browse folders icon.

You are redirected to the Moxie Manager, a file storage utility. From here, you can upload documents or select from documents already in your library. We recommend you use a good naming convention or very descriptive file names, as your list of documents and pictures could get very long. For more information on using MoxieManager, read the article "How to add files to MoxieManager."

Once you select a document to link to, the Text to Display is what the student or educator will see when reading your assignment. The Title is information for your browser. We suggest you set the Target to New window; that way, the user will have two browser windows open, your assignment and the document.

Select the image icon from the editor's toolbar to add a picture to your assignment. The only field required is the source or the location of the image.

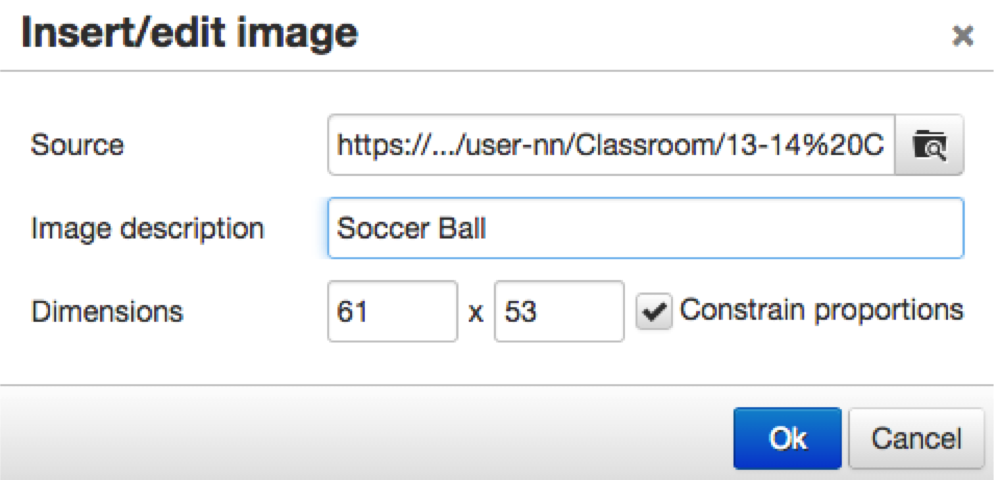
You are, again, directed to Moxie Manager. Upload a new image or select an image already in your library. We recommend you use a good naming convention for your images, too.
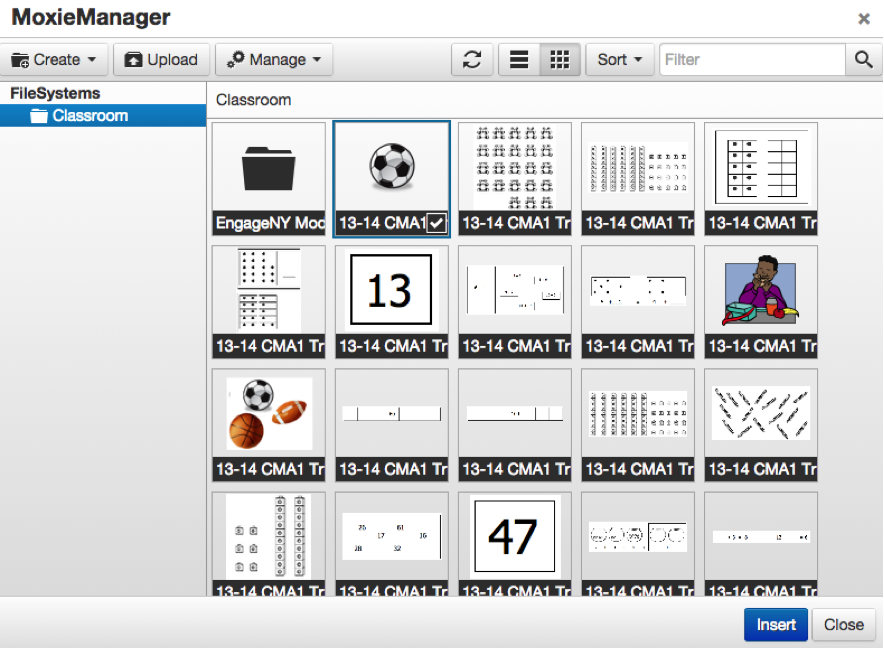
Once you select an image, the source address is filled out. The image description is information for the browser. You can limit the size of the picture when it is displayed by setting its dimensions. These units are in pixels. The most common display measurement for pixels is 72 pixels per inch. If you select the Constrain proportions box, the image will never change the size, even if the student or teacher increases the size of their browser window. We recommend not selecting this option as it hinders people with visual impairments.
Details Tab (back to Quick Links)
An introduction to the assignment and searchable tags. There are many optional fields here, but at minimum, you must enter a Name and a Type (Scores Only, Coursework Assignment, Interview Assessment, Formative Assessment, Summative Assessment, Survey, Standards Grading.) The default assignment type is Coursework. Enter optional Description information, which will be displayed when scoring to help identify the assignment.

Settings Tab - General (back to Quick Links)
Select General from the Settings Tab. Turn off or on the following settings:

Score by Color Band gives you an optional method when scoring the assignment. You can set a raw score for each question but apply a leveled value to the raw scores. This is called a color band value.
Randomize Questions & Answers on Student Taker mixes up the questions for students taking the assignment online. No two students see the questions in the same order, which reduces cheating.
Assignments from this Template Cannot be Copied locks the assignment templates, so they can not be copied by other users. If the assignment template has been added to a bank.
Hide from Students allows an assignment to be available for scoring by the teacher without the student having online access to it. This is typically used when teachers input scores from a paper-pencil assessment.
Scope (Class, School, District, State). Select from the drop-down menu. The scope defaults to the appropriate scope based on the user's role of District Admin (District), School Admin (School), Specialist (School), and Teacher (Class). If the user has multiple roles, it will default to the highest. District scope assignments can be copied to Homeroom and be seen as Assessment Tests. Click Next.
Assignment Instructions (back to Quick Links)
Select Assignment Instructions from the Settings Tab.

While this is optional, if students view the assignment online or on paper, we highly recommend you provide detailed information in the Student Instruction Text area. You can provide the step-by-step requirements for completing the assignment successfully, an estimate of how much time the assignment will take to complete, a scoring rubric, images, links to documents or websites they can use in the assignment, etc. Teacher Instruction Text is only visible to the teacher. The Student Instruction Text is visible to the student and the teacher.


As you step through creating your assignment, make sure you select Save & Continue or the Next button.
Standards Tab (back to Quick Links)
Classroom was designed to be a standards-based gradebook. In order to utilize this feature to its fullest extent, standards should be added to all assignments. Adding standards to assignments is not required; however, we recommend it. If used, you can score and grade students based on standards. You may also benefit from analyzing how the students performed against the standards.
Select the Standards from the Standards tab to access the built-in standards banks in Classroom. To learn more about standards, read the help article Standards.

Select which bank of standards you would like to access. Once you have browsed and selected your standards, click the “+” add button. It will be reflected in the Your Selected Standards at the bottom. A number will appear reflecting the number of standards selected. Click OK when finished.

Passages Tab (back to Quick Links)
Passages include any form of reading material you want to provide the student which relates to the assignment. This area houses the passages and allows you to view, reorder and edit them. The passages can be attached to questions later on the Questions tab. To add a new passage, select Edit>Add Passage under the action gear found to the right.

Just like every other text area in Classroom, you can use the text formatting tools on passages. You can also add multiple passages using the Add Passage button. If you no longer need a passage, select the Delete Passage button.

If you copy existing text from other sources, we recommend selecting Paste...Special or Paste without Match Style (depending on your browser). That is, paste the text only, not the formatting. Because you are creating a document for the web, you'll want to avoid formatting codes from other sources.
Passages have a limit of 8000 characters. If your document is larger than the limit, use the MoxieManager to upload a link and embed the link in the passage.
Questions Tab (back to Quick Links)
When creating a new assignment, you do not have to populate it with questions (for instance, a student directive). However, that is the most common choice. You can either compose a new question from within the assignment or add an existing question from a bank. If you choose to compose a new question from within the assignment, you create a new question template. Select the Compose a Question button and follow the wizard. Please read this article for detailed information on Creating a Question Template.

Select the Add Questions From Bank or Add Question(s) button if you add an existing question. Read the Shared Question and Assignment Banks and Analysis article for more information about question banks.

You can apply various actions once you have composed or added all the questions your assignment needs.

 |
Rearrange the question order - The questions will be numbered accordingly. If students take the assignment online, they will see numbered questions. Click and drag the three horizontal lines. The questions will be renumbered automatically. |
 |
Points - Modify the question points. If you do this, remember to edit the Assignment Points to match the sum of the question points. Click the blue hyperlink. A new pop-up window will appear. |
 |
Manage Passages - First, You must use the Passages tab to add passages to the assignment to attach them to the questions here. Manage them by clicking the blue hyperlink and selecting the toggle. |
 |
Disallow Scoring - Prevent the question from being scored by selecting the toggle. This provides a method to use the question as a container or to give the student a task that you do not intend to grade but which they must complete (a directive). For example, "Collect five samples of local vegetation" could be the first question in a science lab assignment required to answer the remaining questions. |
 |
Omit Calc - Prevent the question points from being included in the overall assignment score by selecting the toggle. This allows you to use the question for informational purposes, the student will receive a score for the question, but it is not calculated in the assignment score. A good example would be entering a student's independent reading level. It's great information, but nothing on which the student is graded. |
 |
Hide on Taker- Allows you to use the question as a divider for your purposes and prevents the question from being visible online by the student. The question is only visible to you and may help you organize an assignment. |
 |
Required - Remove or cut the question from the assignment. This does not remove it from your bank or the shared bank. |
 |
Edit the Question - Or click the blue hyperlink under Text. If this is a question you composed, this takes you to My Question Templates. So, any changes you make to a question, even though you are within an assignment while editing the question, will be reflected in My Question Templates. That is, the change is global. This does not allow you to edit the question in any district-approved shared bank. |
 |
Opens the Question Template. |
 |
View Assignment |
 |
Delete |


Points Tab (back to Quick Links)
Color Bands
Most of the time, assignments are given to students for a score or grade. In Classroom, the default minimum assignment point is 0, and the default maximum is the sum of the question points. Assignment points can be set up to simply indicate whether or not the student met the standards attached to the assignment. However, points can also be broken into color bands or performance levels, which provide a quick visual indicator to a teacher on where the students fell across a range for the assignment. Note that you can remove the assignment required to have a score with the Disallow Scoring toggle.
The default Decimal Precision is 1.0, the default Min and Max scores are 0 and 23, respectively, and the default threshold count is 2. These are used to set up the color bands when selecting the Go button.

Start with the maximum points the assignment is worth and work backward. A new option, Add Color Band, appears when you set a minimum value greater than 1. Use this option to insert additional performance levels. A color band will be inserted between the existing bands. When you fill in the minimum values, Classroom will fill in the maximum values of the lesser performance levels.
You can change the label of the color band (performance level) and the color. You can even use decimal values down to thousandths! And you can mark which level indicates a met standard using the Passing radio button.

Score Ranges


Scoring Symbols


Sharing (back to Quick Links)
Add Contributors to assist in filtering and searching.

Add Options:
Grade Level and Subject are optional fields, but SDS suggests adding them to assist with filtering and searching.
Keywords can be added to the details of any question, and again, while optional, they help refine searches. SDS recommends you add keywords to your questions if you intend to share them with other educators in the district. A comma must separate all keywords.

Banks (back to Quick Links)
In Classroom, shared banks are places where educators can deposit the assignments or assessments they have created to share them with other educators in the district. When you create a New Assignment Template, you can submit it to a Shared Assignment Template bank. A bank manager reviews the assignment for accuracy and relevancy. If approved, your assignment will become part of the shared bank.
To submit your assignment template to a bank, select Add Assignment Template Banks. A district can create as many banks as they need, and each bank can have its bank manager.

Click on the list's appropriate bank(s) and then choose by clicking the checkmark, then click Add Bank. You can submit to more than one bank.

Your assignment will show Export Pending Approval. Once the bank manager reviews it, it may say "Export Approved" or "Export Rejected." If your assignment is rejected, the bank manager can add a comment as to why. You can always correct the assignment and re-submit it if necessary.
PLEASE NOTE: If approved, your assignment is duplicated and deposited into the bank. This new assignment has a new identification in Classroom, and all connection to you is lost. Therefore, you cannot modify or delete your original assignment to modify or delete the assignment that is now in the shared bank. Only a bank manager can modify or delete an assignment in a shared bank. SDS highly recommends that you or a colleague carefully review your assignments before submitting them to a shared bank. Bank managers look to your professional judgment and experience when composing an assignment; therefore, their review may not be as thorough as yours.
Comments
0 comments
Please sign in to leave a comment.